Duplicate URLs can make it difficult for search engines to understand which version of a webpage should appear in search results. For example, the same article might be accessible through different URL variations, tracking parameters, or category paths.
A canonical tag helps solve this problem by identifying the preferred URL for a page. It gives search engines a clear signal about which version you want them to consider as the main page.
If you use WordPress, you can usually manage canonical URLs without editing your theme files. SEO plugins provide simple settings for this purpose, while developers can use WordPress hooks and custom code when they need more control.
In this guide, you’ll learn how to add canonical tag in WordPress, generate a correct canonical URL, configure popular SEO plugins, implement a custom solution, and inspect the final HTML to make sure everything works properly.
- What Is a Canonical Tag?
- Why Canonical Tags Matter for WordPress SEO
- When Should You Use a Canonical Tag?
- How to Generate a Canonical URL
- How WordPress Handles Canonical URLs by Default
- How to Add a Canonical Tag Using Yoast SEO
- How to Add a Canonical Tag Using Rank Math
- How to Add a Canonical Tag Using All in One SEO
- How to Add a Canonical Tag With Custom Code
- How to Inspect a Canonical Tag in HTML
- Common Canonical Tag Mistakes to Avoid
- Canonical Tag Best Practices
- Conclusion
- Frequently Asked Questions
What Is a Canonical Tag?
A canonical tag is an HTML element that tells search engines which URL represents the preferred version of a webpage. It is commonly used when the same or very similar content is available through more than one URL.
The canonical tag uses the rel="canonical" attribute inside a link element. It is placed in the <head> section of a webpage.
Here is a basic example:
<link rel="canonical" href="https://example.com/seo-guide/" />In this example, https://example.com/seo-guide/ is the preferred URL. If another URL displays the same or very similar content, its canonical tag can point to this preferred version.
For example, imagine that your WordPress article is accessible through these URLs:
https://example.com/seo-guide/https://example.com/seo-guide/?source=newsletterhttps://example.com/category/seo/seo-guide/
If these URLs show the same main article, you may want search engines to treat the first URL as the preferred version. A canonical tag can communicate that preference.
However, a canonical tag is a signal, not an absolute command. Google considers several signals when selecting the canonical URL and may choose a different version if its systems find another URL more appropriate.
Why Canonical Tags Matter for WordPress SEO
WordPress websites can create different URL variations through categories, archives, pagination, tracking parameters, and other site features. Some variations are useful for visitors, but they can make URL management more complicated.
Canonical tags help search engines understand which version of similar content you prefer. Here are the main reasons they are useful.
1. Help Search Engines Identify the Preferred URL
When similar content appears at multiple addresses, search engines need to determine which URL should represent that content in search results.
A canonical tag provides a clear preference. This can help search engines understand which version you want them to prioritize.
2. Consolidate Signals for Similar Pages
Different URL versions may receive external links or other signals. Canonicalization can help search engines associate signals from duplicate or similar URLs with the preferred version when they accept the canonical selection.
This is particularly useful when tracking parameters or alternative URL paths create multiple addresses for the same content.
3. Keep SEO Reporting More Consistent
When a page has several URL variations, performance data can become harder to interpret. Choosing a preferred URL helps create a more consistent reference for your content and SEO reporting.
4. Support More Efficient Crawling
Search engines may spend time discovering and crawling different versions of similar pages. Clear canonical signals can help them understand which URLs represent the main content.
Canonical tags do not guarantee that every duplicate URL will stop being crawled. They simply help search engines interpret your preferred URL structure.
When Should You Use a Canonical Tag?
You do not need to create a custom canonical URL for every WordPress page. In many cases, WordPress or your SEO plugin already generates a self-referencing canonical tag automatically.
A self-referencing canonical points to the URL of the page itself. For example, an article at https://example.com/wordpress-seo/ can contain a canonical tag pointing to that same address.
Consider setting a custom canonical URL in situations like these:
Duplicate or Very Similar Articles
If two URLs contain substantially similar content and you want one version to represent the content, the duplicate page can point to the preferred URL.
Tracking Parameters
Marketing campaigns sometimes add parameters to URLs, such as ?utm_source=email. If the parameter version displays the same page, the clean URL may be the preferred canonical address.
Similar Product Pages
An online store may display the same product through different category paths or filtered URLs. A canonical tag can help identify the preferred product URL when the pages are genuinely duplicate or very similar.
Content Republished on Another Website
If your content is republished on another website with permission, the publisher may use a cross-domain canonical pointing to your original article. This can indicate that your page is the preferred version.
Only use a cross-domain canonical when the pages are genuinely duplicate or substantially similar and the arrangement is appropriate for both websites.
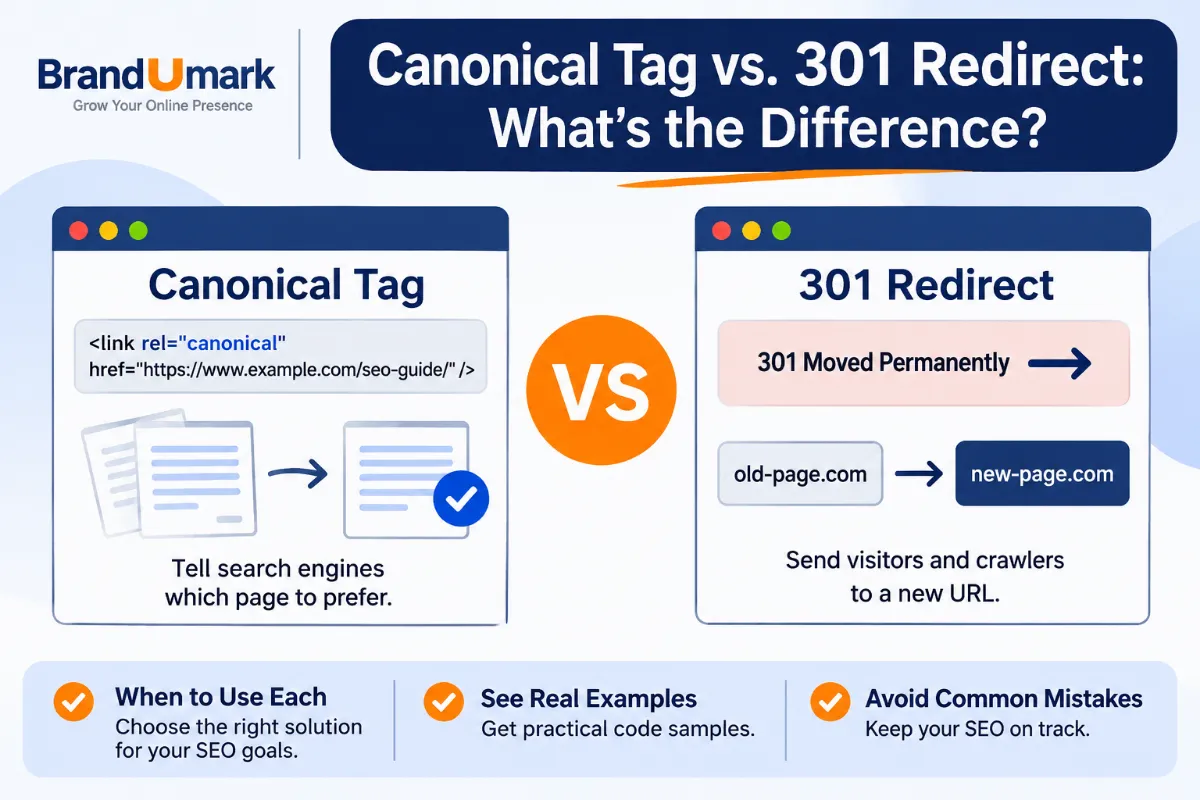
When a Redirect Is Better
A canonical tag is not a replacement for every type of URL cleanup. If an old URL should no longer be accessible and visitors should move to a new URL, a permanent redirect is often the better solution.
For example, if you permanently move an article from /old-seo-guide/ to /new-seo-guide/, use a suitable 301 redirect rather than relying only on a canonical tag.
How to Generate a Canonical URL
Before adding a canonical tag to WordPress, you need to identify the correct URL. The canonical URL should represent the preferred version of the content, not simply whichever URL is easiest to copy.
You can use the BrandUmark Canonical Tag Generator to create the HTML canonical tag.
Step 1: Identify the Preferred Page
Open the page you want search engines to treat as the main version. Check its content, URL, and indexability.
For example, suppose your preferred article URL is:
https://example.com/wordpress-seo-guide/Make sure this is the correct page and that it loads successfully. Check that it does not redirect to another address or return an error.
Step 2: Copy the Complete Canonical URL
Copy the full URL, including the protocol. A complete URL normally begins with https://.
Check these details before using it:
- Use the correct HTTPS or HTTP version, based on your site’s preferred setup.
- Use the correct www or non-www version.
- Keep the trailing slash consistent with your preferred URL structure.
- Remove unnecessary tracking parameters.
- Make sure the URL points to the intended page.
Step 3: Generate the Canonical Tag
Open the BrandUmark Canonical Tag Generator and enter your preferred URL in the generator field.
Generate the tag and review the output. It should follow this format:
<link rel="canonical" href="https://example.com/wordpress-seo-guide/" />The generated code contains two important parts:
rel="canonical"identifies the link as a canonical URL declaration.hrefcontains the complete preferred URL.
Step 4: Review the Generated URL
Before adding the tag, confirm that the URL is correct. A small mistake can point search engines to the wrong page.
For example, do not use a category archive URL as the canonical address if the preferred page is an individual article. Likewise, do not point an important article to a URL that returns a 404 error or redirects elsewhere.
Once the URL is correct, you can add it through your WordPress SEO plugin or a custom implementation.
How WordPress Handles Canonical URLs by Default
WordPress includes built-in canonical URL functionality. For supported singular content, such as individual posts and pages, WordPress can generate a canonical link in the HTML head.
The core function wp_get_canonical_url() returns the canonical URL for a post. WordPress uses this functionality when generating its canonical link through rel_canonical().
This means you may already have canonical tags on your website without manually adding them.
For example, if your published post has this URL:
https://example.com/wordpress-seo-guide/WordPress may output a self-referencing canonical tag like this:
<link rel="canonical" href="https://example.com/wordpress-seo-guide/" />However, SEO plugins can manage or customize canonical output. Your theme, plugins, and site configuration may also affect what appears in the final HTML.
Important: Do not add another canonical tag simply because you cannot see a setting in the WordPress editor. First inspect the page source to find out whether a canonical tag is already present. Multiple conflicting canonical tags can create confusion.
How to Add a Canonical Tag Using Yoast SEO
Yoast SEO can automatically generate canonical URLs for supported WordPress content. In most ordinary situations, you do not need to enter a custom URL.
If you need to point a page to a different preferred URL, you can use the Advanced settings in the editor.
Step 1: Open Your WordPress Post or Page
Log in to your WordPress dashboard and navigate to Posts or Pages.
Find the content for which you want to change the canonical URL. Select Edit to open the WordPress editor.
Step 2: Open the Yoast SEO Settings
Locate the Yoast SEO panel or sidebar in the editor. Open its settings and navigate to the Advanced section.
Step 3: Enter the Canonical URL
Find the Canonical URL field. Enter the complete preferred URL, including HTTPS and the correct domain format.
For example:
https://example.com/original-article/Do not enter a URL just to fill the field. If the page should point to itself, the default canonical generated by Yoast may already be correct.
Step 4: Update the Page
Save your changes by clicking Update or Publish, depending on the page’s current status.
After saving, inspect the page source to confirm that the canonical tag contains the URL you entered.
Yoast also supports programmatic customization through its wpseo_canonical filter. Developers can use this when they need to manage canonical output through code rather than individual editor settings.
How to Add a Canonical Tag Using Rank Math
Rank Math SEO automatically sets a self-referencing canonical URL for supported posts and pages. You can change it when a page needs to point to another preferred URL.
Step 1: Edit the WordPress Content
Open your WordPress dashboard and go to Posts or Pages. Select the content you want to edit.
Step 2: Open the Rank Math Advanced Tab
Find the Rank Math SEO panel in the editor. Open the Advanced tab.
If the Advanced tab is not visible, check whether Rank Math is using Easy Mode. You may need to enable Advanced Mode from the Rank Math dashboard settings.
Step 3: Find the Canonical URL Field
Inside the Advanced settings, locate the Canonical URL field.
Enter the complete preferred URL. For example:
https://example.com/preferred-wordpress-guide/Step 4: Save Your Changes
Click Update or Publish to save the page.
Rank Math will use the custom canonical URL when generating the page’s canonical output. Visit the published page and inspect its HTML to verify the result.
If you need to customize canonical output programmatically, Rank Math also provides the rank_math/frontend/canonical filter.
How to Add a Canonical Tag Using All in One SEO
All in One SEO (AIOSEO) also supports canonical URL settings for WordPress content. Its default behavior can handle ordinary self-referencing canonical URLs, while its Advanced settings allow you to specify a different preferred URL.
Step 1: Open the Post or Page
From your WordPress dashboard, open the post or page you want to edit.
Step 2: Locate AIOSEO Settings
Scroll down to the AIOSEO Settings section in the editor. Open the Advanced tab.
Step 3: Enter Your Preferred URL
Find the Canonical URL field and enter the complete URL you want to use as the preferred version.
For example:
https://example.com/main-guide/Step 4: Save and Verify
Update the post or page. Then open the published URL and inspect the HTML source to confirm that the canonical tag points to the intended address.
AIOSEO also offers a developer filter named aioseo_canonical_url for customizing canonical URL output through code.
How to Add a Canonical Tag With Custom Code
If you are comfortable working with PHP, you can customize canonical URLs through WordPress hooks. This approach is useful when you need a programmatic rule for several posts or a custom content setup.
For most websites, an SEO plugin is easier to maintain. Use custom code only when you understand how your theme and existing SEO plugins generate canonical tags.
Option 1: Use the WordPress get_canonical_url Filter
WordPress provides the get_canonical_url filter, which allows developers to modify the canonical URL returned for a post.
The following example checks for a custom field named custom_canonical_url. If the field contains a valid URL, the code uses it. Otherwise, WordPress keeps its original canonical URL.
function bum_custom_post_canonical_url( $canonical_url, $post ) {

    $custom_url = get_post_meta(
        $post->ID,
        'custom_canonical_url',
        true
    );

    if ( empty( $custom_url ) ) {
        return $canonical_url;
    }

    $custom_url = esc_url_raw( $custom_url );

    if ( empty( $custom_url ) ) {
        return $canonical_url;
    }

    return $custom_url;
}

add_filter(
    'get_canonical_url',
    'bum_custom_post_canonical_url',
    10,
    2
);
This example assumes that the custom field already exists and contains the intended canonical URL. It does not create a field in the WordPress editor or provide a settings interface.
How This Code Works
get_post_meta()retrieves the custom canonical URL stored for the post.- The empty-value check keeps the original canonical URL when no custom value exists.
esc_url_raw()sanitizes the URL before it is returned.add_filter()connects the function to WordPress’s canonical URL filter.
Developers can add the code to a small custom plugin or a child theme’s functions.php file. A custom plugin is often easier to maintain because the functionality does not depend on the active theme.
Option 2: Add a Canonical Tag Directly to the HTML Head
On a custom WordPress setup, you may need to output a canonical tag through the wp_head action. However, you must first make sure that WordPress core or an SEO plugin is not already outputting a canonical tag for the same page.
Here is a basic example for a specific page ID:
function bum_add_custom_page_canonical() {

    if ( ! is_page( 123 ) ) {
        return;
    }

    $canonical_url = 'https://example.com/preferred-page/';

    echo '<link rel="canonical" href="' .
        esc_url( $canonical_url ) .
        '" />' . "\n";
}

add_action( 'wp_head', 'bum_add_custom_page_canonical', 1 );
Replace 123 with the actual WordPress page ID and replace the example URL with your preferred canonical URL.
Important: This example outputs a canonical tag directly. If another system already outputs a canonical tag, the page could end up with multiple declarations. Do not use this method alongside an existing canonical output unless you have deliberately disabled or replaced the other output.
Important Checks Before Using Custom Code
- Back up your website before making code changes.
- Test the code on a staging website first.
- Use a child theme or custom plugin rather than editing a parent theme directly.
- Check whether your SEO plugin already manages canonical tags.
- Inspect the final HTML after adding the code.
- Confirm that the canonical URL returns a working, indexable page.
If you are not comfortable with PHP, use one of the SEO plugin methods described earlier or ask a WordPress developer to implement the custom logic.
How to Inspect a Canonical Tag in HTML
Adding a canonical URL in WordPress is only part of the process. You should also confirm that the correct tag appears in the published page’s HTML.
This step helps you catch incorrect URLs, missing tags, and conflicts between plugins or custom code.
Method 1: View the Page Source
This is one of the simplest ways to inspect a canonical tag.
- Open the published WordPress page in your browser.
- Right-click anywhere on the page.
- Select View Page Source.
- Use
Ctrl + Fon Windows orCommand + Fon Mac. - Search for
rel="canonical".
You should find a line similar to this inside the document’s head section:
<link rel="canonical" href="https://example.com/wordpress-seo-guide/" />Check the URL inside the href attribute. It should match your intended canonical URL.
Method 2: Use Browser Developer Tools
You can also inspect the page through your browser’s developer tools.
- Open the published page.
- Right-click and select Inspect.
- Open the Elements panel.
- Expand the
<head>element. - Search for
rel="canonical".
This lets you inspect the HTML currently represented in the browser’s document. If you need to check exactly what the server returned, use View Page Source as well.
Method 3: Check Google Search Console
Google Search Console can help you understand how Google treats a specific URL.
- Open Google Search Console for your website.
- Enter the page URL in the URL Inspection field.
- Wait for the inspection results.
- Review the page indexing details.
- Look for the user-declared canonical and Google-selected canonical information, when available.
The user-declared canonical shows the preference communicated by your website. The Google-selected canonical shows the URL Google chose for its index.
These URLs may not always match. Google can select a different canonical based on its assessment of the page and other signals.
What Should You Check?
When inspecting your canonical tag, review the following points:
- Correct URL: The canonical tag should point to the intended preferred page.
- One clear declaration: Avoid multiple conflicting canonical tags.
- Correct protocol: Use your preferred HTTPS or HTTP version consistently.
- Working destination: The canonical URL should not lead to an error page or unnecessary redirect.
- Indexability: Check that the preferred page is not blocked from indexing unintentionally.
- Consistent signals: Internal links and sitemap entries should support the same preferred URL.
Common Canonical Tag Mistakes to Avoid
A canonical tag is a small piece of HTML, but an incorrect setting can send confusing signals. Avoid these common mistakes when managing canonical URLs in WordPress.
1. Adding Multiple Canonical Tags
Installing more than one SEO plugin or adding custom code without checking existing output can create multiple canonical tags.
For example, WordPress core may output one canonical URL while an SEO plugin outputs another. Search engines may have difficulty interpreting conflicting declarations.
Use one clear canonical implementation for each page and inspect the final HTML.
2. Pointing to the Wrong Page
Do not point a blog post to an unrelated article, homepage, or category archive simply to consolidate URLs.
The canonical destination should be the preferred version of the same or substantially similar content.
3. Using a Broken Canonical URL
A canonical URL should lead to a working page. Avoid pointing to a URL that returns a 404 error, redirects unnecessarily, or is unavailable.
Test the destination before publishing your canonical setting.
4. Mixing HTTP, HTTPS, www, and Non-www Versions
Your canonical URL should match your website’s preferred domain and protocol.
For example, if your website consistently uses HTTPS without www, avoid pointing canonical tags to the HTTP or www version without a specific reason.
5. Using Canonical Tags Instead of Redirects
If you no longer want an old page to exist, a permanent redirect may be more appropriate than a canonical tag.
Canonical tags are useful when duplicate or similar URLs need to remain accessible. Redirects are generally more suitable when one URL is being permanently replaced by another.
6. Pointing a Page to a Noindex URL
Do not casually set a canonical URL to a page that is blocked from indexing or marked noindex. Your preferred canonical page should normally be accessible and eligible for indexing.
7. Assuming Google Must Follow Your Canonical
Google treats canonical declarations as signals rather than guaranteed instructions. It may choose another URL if other signals suggest that a different page is more appropriate.
Make sure your canonical tags, redirects, internal links, and sitemap all communicate a consistent URL preference.
Canonical Tag Best Practices
Follow these practical guidelines to manage canonical URLs more consistently across your WordPress website.
- Use absolute URLs: Include the complete URL, including the protocol and domain.
- Prefer self-referencing canonicals: For an indexable original page, a canonical tag pointing to itself is generally a good practice.
- Choose relevant destinations: Point duplicate or very similar pages to the appropriate preferred version.
- Keep URL formats consistent: Use the same HTTPS, www, and trailing-slash conventions throughout your website.
- Use one canonical system: Avoid overlapping plugin and custom-code implementations.
- Keep internal links consistent: Link to the preferred URL rather than repeatedly linking to duplicate versions.
- Keep your sitemap consistent: Include the preferred URLs you want search engines to discover.
- Check after major changes: Review canonical tags after changing themes, SEO plugins, permalink settings, or URL structures.
- Use redirects when appropriate: Permanently redirect URLs that should no longer remain separate pages.
Remember that canonicalization is part of a wider technical SEO process. It works best when your website’s URL structure, internal links, redirects, and sitemap all support the same preferred versions.
Conclusion
Learning how to add canonical tag in WordPress helps you manage duplicate and similar URLs more effectively. A correctly configured canonical tag tells search engines which version of a page you prefer them to consider as the main URL.
For most WordPress websites, an SEO plugin such as Yoast SEO, Rank Math, or All in One SEO provides the simplest way to manage canonical URLs. Developers can also use WordPress filters or custom code when they need more advanced control.
Before publishing, generate and review the preferred URL using the BrandUmark Canonical Tag Generator. Then inspect the page source and, when needed, use Google Search Console to compare your declared canonical with Google’s selected version.
Keep your canonical signals consistent, avoid conflicting tags, and use redirects when a duplicate URL should be permanently replaced.
Frequently Asked Questions
1. How do I add a canonical tag in WordPress?
To add a canonical tag in WordPress, edit your post or page and open the Advanced settings in your SEO plugin. Enter the complete preferred URL in the Canonical URL field and update the page. You can then inspect the HTML source to confirm the tag is present.
2. Does WordPress automatically generate canonical tags?
Yes. WordPress includes built-in canonical URL functionality for supported singular content, such as posts and pages. SEO plugins can also manage canonical output and provide settings for custom canonical URLs.
3. Do I need a plugin to add a canonical tag in WordPress?
No. You can use WordPress hooks or custom PHP code to manage canonical URLs. However, an SEO plugin is usually easier for beginners because it provides canonical settings directly in the content editor.
4. How do I generate a canonical URL?
Identify the preferred version of your webpage, copy its complete URL, and enter it into a canonical tag generator. The tool creates the HTML link element containing the rel="canonical" attribute and your selected URL.
5. Where should a canonical tag appear in HTML?
A canonical tag should appear inside the <head> section of the HTML document. It normally looks like this: <link rel="canonical" href="https://example.com/page/" />.
6. How can I check if my canonical tag is working?
Open your published page, select View Page Source, and search for rel="canonical". Check that the URL is correct. You can also use Google Search Console’s URL Inspection tool to review the user-declared and Google-selected canonical information.
7. Can I have more than one canonical tag on a page?
You should avoid multiple canonical tags on the same page, especially when they point to different URLs. Use one clear canonical declaration and check whether WordPress, your SEO plugin, or custom code is already generating one.
8. Does a canonical tag guarantee that Google will index my preferred URL?
No. A canonical tag is a signal that helps Google understand your preferred URL, but Google makes the final canonical selection. It may choose a different URL based on page content, redirects, internal links, sitemap information, and other signals.
9. Should I use a canonical tag or a 301 redirect?
Use a canonical tag when duplicate or similar URLs need to remain accessible but you want to identify a preferred version. Use a 301 redirect when an old URL has been permanently replaced and visitors should be sent to the new address.
10. Can I use a canonical tag for a page on another domain?
Yes. A cross-domain canonical can point to the preferred version of duplicate or substantially similar content on another website. Use it only when the content relationship is appropriate and the other website agrees with that canonical preference.